By Richard McAvoy, Professor & Extension Specialist – Greenhouse Crops,
2012
Grafting the scion of a desirable cultivar onto a rootstock to enhance disease resistance or improve vigor and yield has become common practice. This process is most efficient when done at the plug or early seedling development stage. At this stage the plants take up little room in the propagation house, growers have little time invested, plant handling for grafting is easy and success tends to be high.
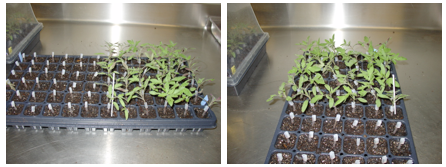
I like to graft when the plants are about 2½ to 3 weeks from sowing or at the stage where the second set of true leaves are about half expanded (Figure 1). I use tube clips that are 2.0 to 2.5 mm in size. You can graft smaller plants, using 1.5 mm clips, provided you have the manual dexterity for it. This is a little small for my hands.
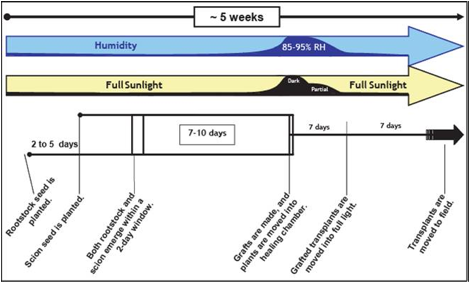
I direct sow the cultural variety (the scion variety) into either a jumbo plug (72 cells) or a 606 cell flats. With larger cells (the 36 cell 606 flat) you can raise the plants to final transplant size. I do the same with the rootstock variety. Depending on the vigor and growth habit of these lines, you may need to start one a few days before the other. Typically, I would start the rootstock about 3 days before the cultural variety however, you need to test this under your conditions (see Fig S). You are looking to have two groups of plants (rootstock and scion) that have the same stem diameter below the seed leaves (the cotyledons) at the same point in time.
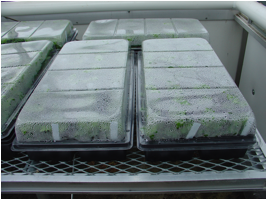
For grafting, I cut off the tops of the rootstock variety below the cotyledons and discard the tops. I do an entire flat at once and I just use a square cut (cut horizontally across the stem). Some people prefer a diagonal cut to increase contact area between scion and root but with small plants it is hard to get the same angle on all plants and it is more important that the cut ends of the scion and rootstock make good contact than it is to have a slight increase in surface area. Next, I place a clip on each cut rootstock stem, doing the whole flat at once (Figure 1). Place the clips so that half the length grips the rootstock and half the length is available to receive the scion. Next, I spray mist over the scions, one flat at a time, and cut off all of the shoots just below the cotyledons. Now just slip each shoot into each available clip. Make sure the two cut ends touch and make sure the scion fits snuggly into the clip. Once the flat is completed, mist once more and tent the flat to keep humidity high, or place it in a propagation area with fog or mist (Figure 2).
During the clipping process, I find it useful to have clips of several different sizes on hand because the stem diameter will be variable and 1-day in timing of the operation will make a difference. For instance, if I am targeting grafting plants with a stem diameter of 2.5 mm. I will have mostly 2.5 mm clips but also a supply of 2.0 and 3.0 mm clips. If individual stems are too thick or too thin I will just switch to a larger or smaller clip.
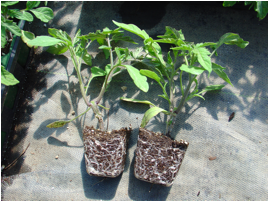
Keep the grafted plants from wilting by misting or tenting. If they are not wilting after 24 hours I usually get close to 100% success. You can start cutting back on mist after 3 days and begin to crack open the tent after 5 days. By day 7-10, the plants should be completely weaned from mist. You will notice the plants have grown noticeably by this time and will begin to squeeze the soft clips off of the stems. Once out of the mist, you can pinch the plants to just above the cotyledons to make a double shoot plant if desired (Figure 3).
Disclaimer for Fact Sheets: The information in this document is for educational purposes only. The recommendations
contained are based on the best available knowledge at the time of publication. Any reference to commercial products, trade or brand names is for information only, and no endorsement or approval is intended. UConn Extension does not guarantee or warrant the standard of any product referenced or imply approval of the product to the exclusion of others which also may be available. The University of Connecticut, UConn Extension, College of Agriculture, Health and Natural Resources is an equal opportunity program provider and employer.